Monday, December 23, 2019

ERP disaster zone: The mostly costly failures of the past decade


ERP disaster zone: The mostly costly failures of the past decade

Billions wasted, lawsuits launched

Enterprise resource planning projects are notoriously difficult to get right. While everyone wants the latest tech, that is less than half the challenge, and whether organisations choose Oracle, SAP, Infor, or IFS, they face a dilemma.
Either they customise the software to fit their processes, creating a tangled mess of wares which will be nearly impossible to upgrade. Or they adopt standardised processes, which require lots of training and invite "change management" consultants into the business.
Projects also raise the prospect of IT bosses facing hordes of angry users who cannot see why they should do their jobs differently. IT departments are damned either way.
Unsurprisingly, not everyone gets it right – and a few get it spectacularly wrong. In no, particular order, The Register is getting in the festive mood, and brings you the biggest ERP disasters of the decade.

Sky-high budget burn

The US Airforce combat support system cost $1bn. First commissioned in 2005, the Oracle-based Expeditionary Combat Support System had failed to offer any significant benefits by 2012. After estimating the project would require another $1.1 billion spending on it to accrue just one quarter of the benefits originally imagined, the US Airforce decided to take flight.
In 2014, the US Senate's Permanent Subcommittee on Investigation found the project violated many crucial guidelines and best practices for information technology acquisition.
"[The Airforce] lacked a clear objective and the organisational will to implement changes to its internal business processes vital to integrating ECSS into the organisation," it said.

Lidl – where quality ERP programmes are cheaper?

German budget supermarket Lidl canned its SAP project in July 2018 after spending €500m on it.
Originally billed as an early implementation of SAP's in-memory system S/4Hana, the Lidl project was designed to replace its in-house legacy merchandise management system. The discount retailer initially introduced the merchandise management and information system at its Austrian stores in 2015. It had then intended to roll the software out to 10,000 stores and more than 140 logistics hubs. But a memo sent by the head of Lidl, Jesper Hoyer, said the strategic goals as originally defined by the project could not be achieved without the retailer having to spend more than it wanted.

MillerCoors goes to court over SAP project problems

In 2017, MillerCoors filed a $100m breach of contract lawsuit against India-based IT services firm HCL Technologies over its introduction of an SAP ERP system. Although the case was eventually amicably settled, it highlights some of the thorny challenges inherent in enterprise software projects.
In its initial filing, the US drinks giant alleged that HCL could not sufficiently staff the project and maintain the project schedule. In turn, HCL filed a counter-claim claiming that MillerCoors was trying to make it a "scapegoat" for the brewer's own failings. The project was supposed to create $550m in costs savings by consolidating MillerCoors' and Molson Coors' supply chain following their merger.

Revlon suffers service disruption after ERP go-live

According to a class action lawsuit filed in 2019, beauty products manufacturer Revlon failed to fulfil product shipments of approximately "$64m" of net sales because of problems with an SAP ERP implementation, the filing in the US District Court in New York claimed. The difficulties affected Revlon's ability to make certain products and deliver goods to certain US retailers, the court documents alleged. Three investor lawsuits have since followed.
In 2018, Revlon's second quarter results ascribed approximately $30m in net sales decline related to the SAP service level disruptions.

UK research councils spy £51m over-spend

In January 2006, seven UK research councils agreed to create a shared back office across the human resources, procurement, finance, ICT and grants functions. The project ran into the following decade and also into trouble. Oracle and Fujitsu worked on the project. The Councils eventually terminated the contract with Fujitsu, at a cost of £13m. Implementation was due to be completed by December 2009 at a cost of £79m. By 2011, there was a 65 per cent overspend on implementation costs which reached £130m.
In 2011, the UK's National Audit Office (PDF) concluded: "The shared service centre project has not to date delivered against its key objectives, notably harmonisation of back-office functions. With available evidence showing delivered savings already adrift of the business plan estimate by at least £73m, implementation of this project does not represent good value for money."

Vodafone CRM system dials up £4.6m regulator fine

In 2016, UK telecoms regulator Ofcom fined Vodafone £4.6m for failing customers, inaccurate billing and poor complaints handling. Vodafone said the issues were due to errors "during a complex IT migration", which involved moving more than 28.5 million customer accounts and almost one billion individual customer data fields from seven legacy billing and services platforms to one.
The project was the largest of its kind ever undertaken by Vodafone anywhere in the world, it said. But Ofcom claimed the telecoms firm had failed to act quickly enough to identify or address these problems. The company only took effective steps to stop pay-as-you-go customers from paying money for nothing (and reimbursed them) when the regulator intervened.
So there you have it. Notoriously difficult to implement. Notoriously expensive when they fail. Still, there are lots of lessons from history that future ERP projects can learn from... in order to make a whole, new, fresh set of mistakes. ®
Thursday, September 12, 2019

Create Virtual Machine on Wndows 10

Create Virtual Machine on Wndows 10

https://www.download3k.com/articles/How-to-add-an-XP-Mode-Virtual-Machine-to-Windows-10-or-8-using-Hyper-V-00770#1


How to add an XP Mode Virtual Machine to Windows 10 (or 8) using Hyper-V

by Mihai Neacsu on 15 October 2014 · 1598489 views
Support for Windows XP has ended, and, although unofficial service packs exist, a better and safer idea would be to run XP as a virtual machine under your current OS if you still need to do some testing under XP.
If you have an XP Setup ISO or an XP installation disc, creating a virtual machine running XP is much easier, but if you don't, you can follow the tutorial below to install XP Mode under Windows 10. It works for Windows 8/8.1 Pro as well.
Notes:

a) The resulting virtual machine will run XP non-activated, without a license key, and you can use it for 30 days before it locks down. After the 30 days run out, you can re-create the virtual machine once again and use it for another 30 days, and so on. This is definitely not convenient for continuous use but will due just fine for testing old software or malware, for example. Alternatively, if you have an old XP license lying around, you can use it to register this installation.

b) If your Windows 8/8.1 or 10 does not include Hyper-V (test that by doing step 4 below - the Home editions for instance don't include Hyper-V), then you won't be able to do this tutorial. You can still create an XP virtual machine using VMWare Player or VirtualBox, by following this tutorial: "How to test Windows 10, 8, 7, Vista, XP for Free, Legally".
XP Mode was introduced for Windows 7 (Professional, Enterprise, or Ultimate) users as a way to run software designed for XP in Windows 7. For Windows 7 users, installing the XP Mode is easy: download XP mode, run the installer, done. Since Wiindows 8 or 10 does not support XP Mode, we'll need to extract the virtual hard drive included in XP Mode and run it as a virtual machine. Here's what you'll need to do:
  1. Download XP Mode
  2. Install 7-zip
  3. Extract VirtualXPVHD from the XP Mode file
  4. Enable Hyper-V
  5. Create a Virtual Machine running VirtualXPVHD
  6. Run the virtual machine
  7. Rejoice
  8. Or not, and make the internet connection work on the XP VM

1. Download the XP Mode from Microsoft

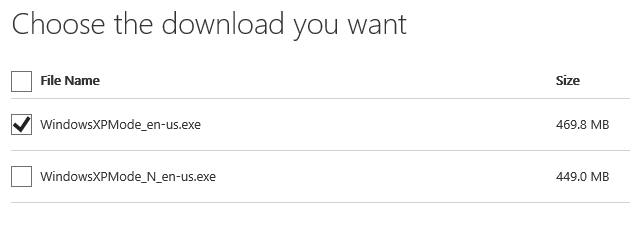
XP Mode is available for download directly from Microsoft: Download Here. Clicking the red download button on that page will give you the choice in the image below.

1 full How to add an XP Mode Virtual Machine to Windows 10 or 8 using HyperV

The difference between WindowsXPMode_en-us.exe and WindowsXPMode_N_en-us.exe is that the version with N in it does not contain Windows Media Player. Choose the one you want, click Next and continue with the download.
Alternatively, you can download WindowsXPMode_N_en-us.exe from Developer Link 3 on this page on Download3k.

2. Install 7-zip

Note: If you are unable to do step 2 and 3 below, using 7-zip, then you can try a different compression utility, such as WinRar, WinZip, Bandizip (one of our favorites here at Download3k), etc. This problem has been pointed out a few times in the comments section.
Download 7-zip (Download3k mirror) and install it. It's important to install the 32-bit (also called x86) version of 7-zip for a 32-bit operating system and the 64-bit (also called x64) version for a 64-bit OS, since the x64 version won't work on x86 and the x86 version won't run with context menu on x64 machines. We'll need context menu for 7-zip to make extracting easier.
Skip to Step 3 if you know what type of system you're in.
If you are not sure if you have a x86 or x64 operating system installed, you can find this out in several ways. Here are 2:
a) Press Win+X (this opens the Power User Menu) and select System. Look under System > System type for the OS type you have installed.
or
b) Click Start (or press the Win key) and type PC Info. Look under System type and find out the type of OS you're running.
Now that you know what type of OS you have installed, download and install the corresponding version of 7-zip.

3. Use 7-zip to extract its contents

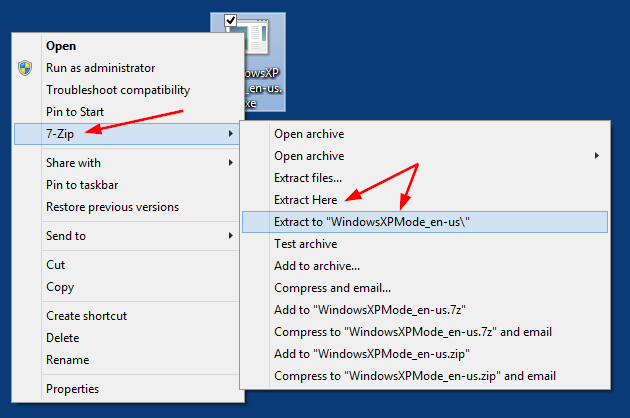
a) Right-click the file downloaded at Step 1 above and select 7-zip > Extract Here or Extract to "WindowsXPMode_en-us" (or the filename you downloaded)
4 full How to add an XP Mode Virtual Machine to Windows 10 or 8 using HyperV
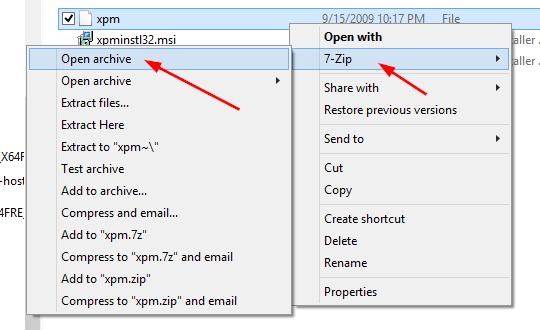
b) After extraction. browse to Sources and notice the xpm file. Right click on xpm and choose 7-zip > Open archive.
5 full How to add an XP Mode Virtual Machine to Windows 10 or 8 using HyperV
Quick tip: If you don't see the Sources folder at this time, go back one step and from the same 7-zip right-click context menu, choose open archive as CAB, instead of extracting to "WindowsXPMode_en-us", then pick up from there.
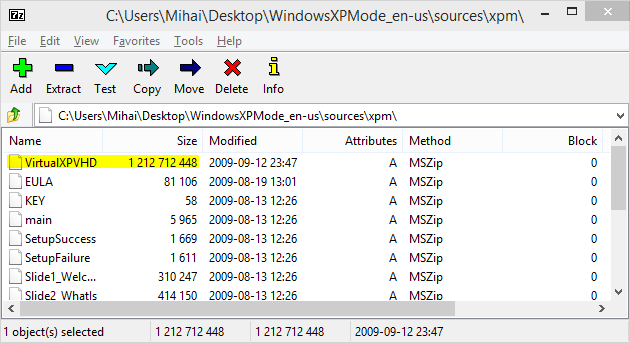
Notice the VirtualXPVHD file.
6 full How to add an XP Mode Virtual Machine to Windows 10 or 8 using HyperV
c) Extract it to a location of your choice. Rename it to VirtualXPVHD.vhd.
d) Clean up. You can go ahead and delete the file downloaded in Step 1 and all the other files extracted from it, except for VirtualXPVHD.vhd.
In order to use the .vhd image in a virtual machine, you can either use VirtualBox or the built-in Windows Virtualization called Hyper-V. Since VirtualBox is currently experiencing some bugs under Windows 10, we'll cover the Hyper-V method below.

4. Activate Hyper-V on your Windows 10

By default, Windows 10, just as Windows 8 did, comes with a few features disabled, including the Hyper-V technology.
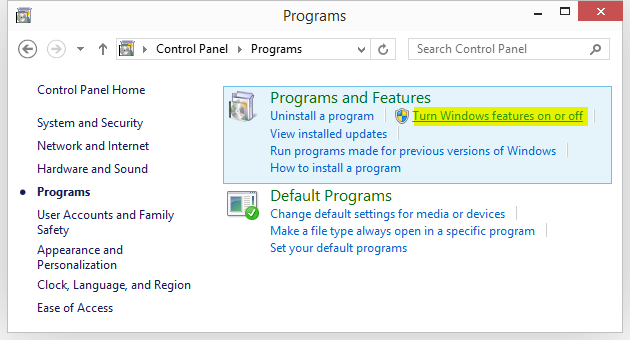
a) In order to enable Hyper-V, you need to go to Win+X (opens the power user menu) > Control Panel > Programs > Turn Windows features on or off, under Programs and Features.
2 full How to add an XP Mode Virtual Machine to Windows 10 or 8 using HyperV
Alternatively, you can open the Run command (Win+R) or do a search (Win+S) and enter optionalfeatures, then hit Enter.
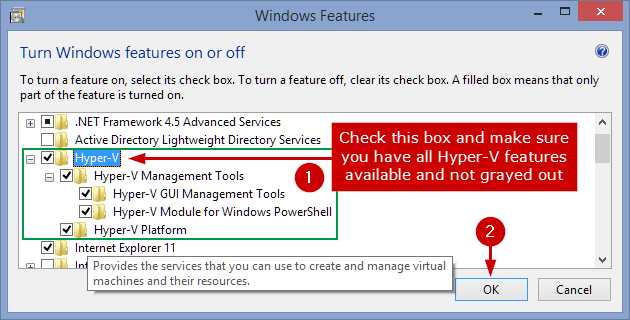
b) This will open a new window where you must tick the box near Hyper-V, as shown in the image below, then click OK.
Hyper-V under optional Windows features
You will be prompted to restart. Do so. Upon re-entering Windows, Hyper-V will be enabled. The image above shows the Hyper-V options under Windows 8.1 - it looks similar in Windows 10.
If some of your Hyper-V options are grayed out, you should restart, enter BIOS and enable virtualization there first. BIOS menus are different from manufacturer to manufacturer, so you should search for settings regarding Virtualization, Data Execution Prevention (DEP), and SLAT. Enable them and restart.
If you don't see Hyper-V Platform or it appears grayed out in the 'Windows Features' window above, then you won't be able to create a virtual machine using Hyper-V.
Tip: check Hyper-V hardware compatibility by opening up PowerShell or Command Prompt (cmd.exe) and entering systeminfo.exe. It should list, under Hyper-V Requirements:
VM Monitor Mode Extensions: Yes
Virtualization Enabled In Firmware: Yes
Second Level Address Translation: Yes
Data Execution Prevention Available: Yes

5. Create a virtual machine for XP Mode in Hyper-V Manager

a) Open Hyper-V Manager by clicking Start (or press the Win key) and type Hyper-V Manager, then Enter.
Alternatively, you can open Start or Run (Win+R) and enter Virtmgmt.msc, then Enter.
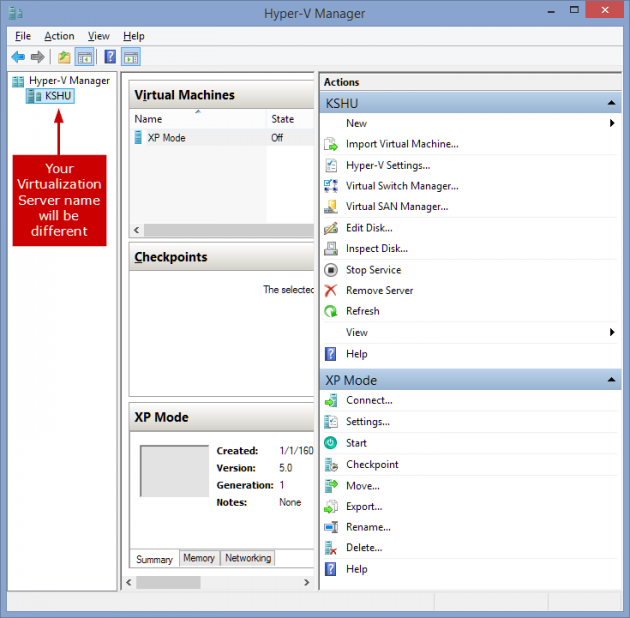
b) Make sure your local virtualization server is selected.
18 large How to add an XP Mode Virtual Machine to Windows 10 or 8 using HyperV
If the left pane shows no Hyper-V servers (your local host computer) to connect to, then select the "Hyper-V Manager" in the left pane, click "Connect to server" on the right pane, select "Local computer" in the dialog that follows and click "OK".
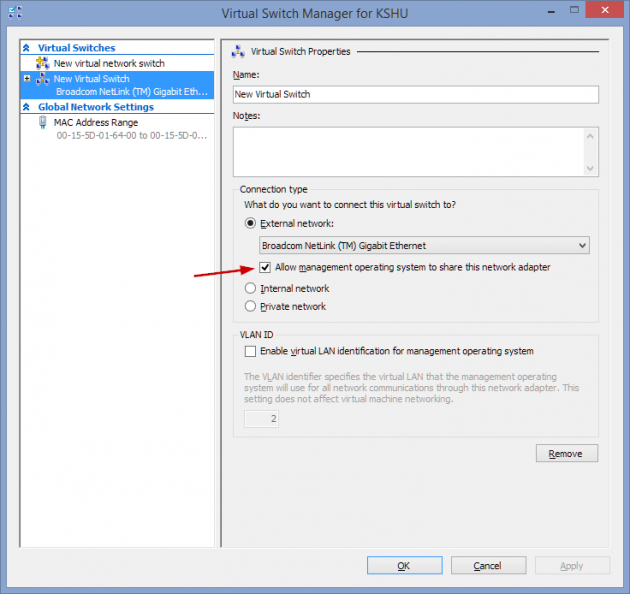
c) Optional: if you need an internet connection for your virtual machine, you need to setup a virtual switch by going to Action > Virtual Switch Manager, in the Hyper-V Manager window.
Here you can create an External Virtual Switch, linked to your physical network card. Make sure the box Allow management operating system to share this network adapter is checked.
17 large How to add an XP Mode Virtual Machine to Windows 10 or 8 using HyperV
This default type of network connection does not work for XP and Vista so, if at the end of the tutorial you still don't have an internet connection for your XP VM, see the troubleshooting part.
d) Click Action > New > Virtual Machine. This will open an wizard.
e) Click Next and, in the next window, specify a name for your server.
f) In the next window, select Generation 1. (Generation 2 is only used for Windows 8 64-bit or newer and Windows Server 2012 or newer guest operating systems)
g) Specify an amount of RAM in the next window. 512 MB or 1024 MB should do it.
h) In the next window you can configure networking. If you need to use internet, you must redo the procedure from step a) and don't skip step c). If you don't need internet for your XP VM, press Next.
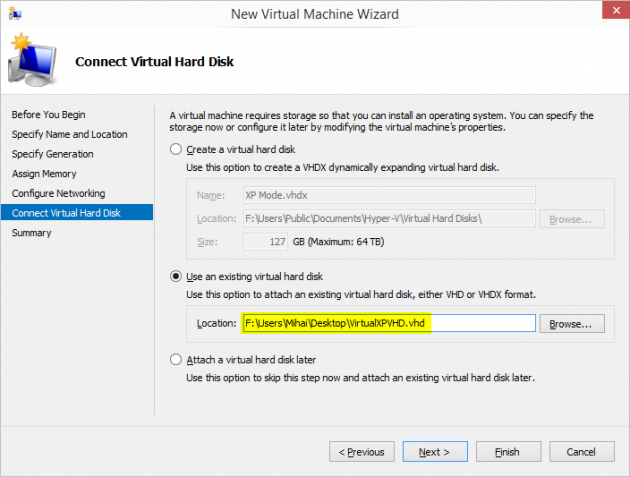
i) Select Use an existing virtual hard disk and browse for the VirtualXPVHD.vhd file from Step 3, as shown below. The Location path will vary in your case.
7 full How to add an XP Mode Virtual Machine to Windows 10 or 8 using HyperV
j) Click Next for Summary, then Finish.
Your XP Virtual Machine is now created.

6. Run the virtual machine

You need to connect to your newly created XP virtual machine and start it. There are several ways to do that.
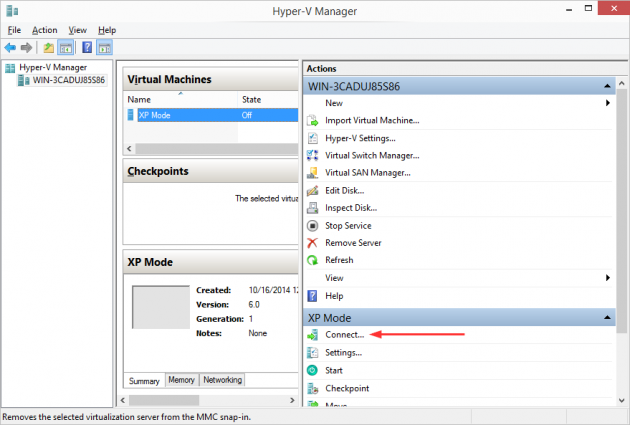
a) One way is to click Connect under your XP VM, in the right Actions column, as shown below.
8 large How to add an XP Mode Virtual Machine to Windows 10 or 8 using HyperV
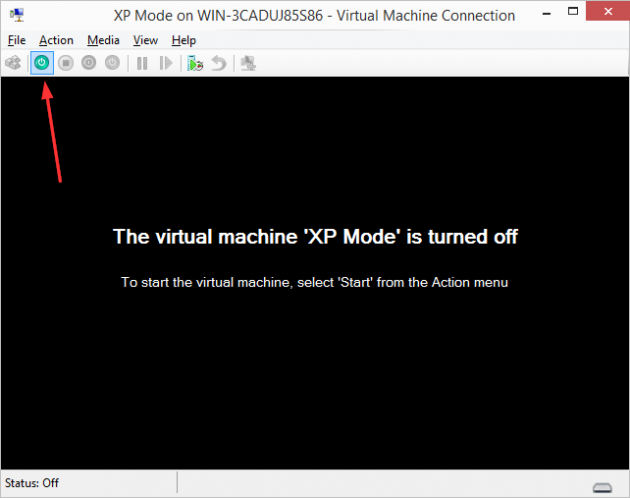
b) In the new window that opens, click the green Start button. See the image below for clarification.
9 large How to add an XP Mode Virtual Machine to Windows 10 or 8 using HyperV
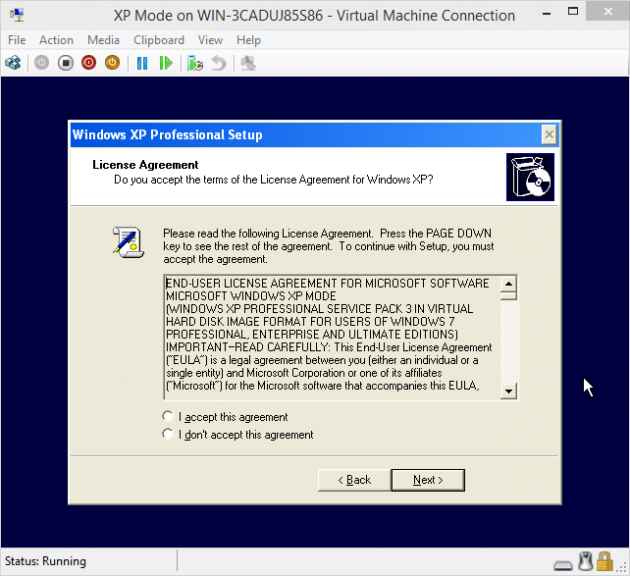
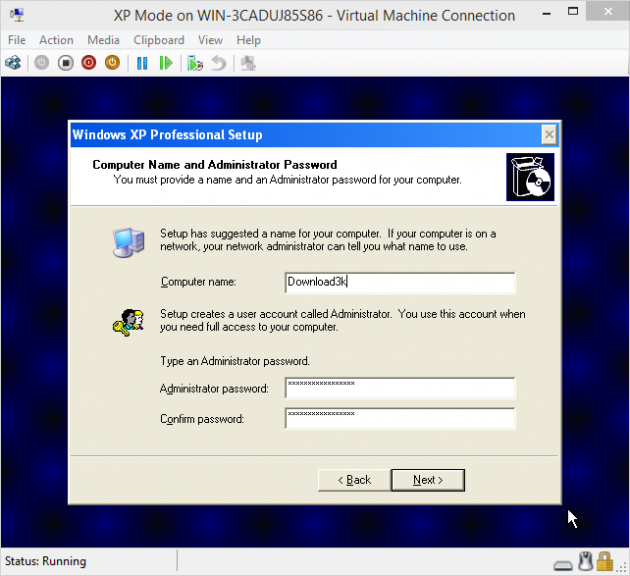
c) The first time you start the VM, it will do the last steps of a regular XP installation. It won't go through the full XP installation, but you'll still need to agree to Terms, pick a computer name, set time and date, language and, after a final reboot, it will prompt you to configure updates.
10 large How to add an XP Mode Virtual Machine to Windows 10 or 8 using HyperV
11 large How to add an XP Mode Virtual Machine to Windows 10 or 8 using HyperV
That's it. If everything went ok, you should now have a working XP Virtual Machine inside your Windows 10 (or 8). Bonus tipCreate a shortcut for this Hyper-V Virtual Machine.
Alternatively, you can read this guide "How to test Windows 10, 8, 7, Vista, XP for Free, Legally" and see if it suits your needs better.
Later edit to cover network connectivity troubleshooting:

Make the Internet work on the XP Virtual Machine

If the internet connection is not working on your newly created XP Virtual Machine, here's what you can try:
  1. Turn off the XP Virtual Machine.
  2. Open its settings window. You can do this in several ways:
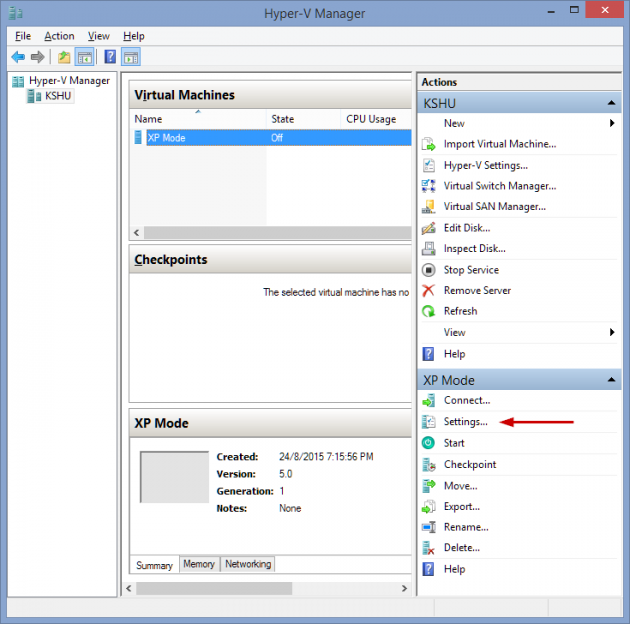
    - a) From the Hyper-V Manager, select the XP Virtual Machine and, in the right hand pane, click Settings.

    13 large How to add an XP Mode Virtual Machine to Windows 10 or 8 using HyperV
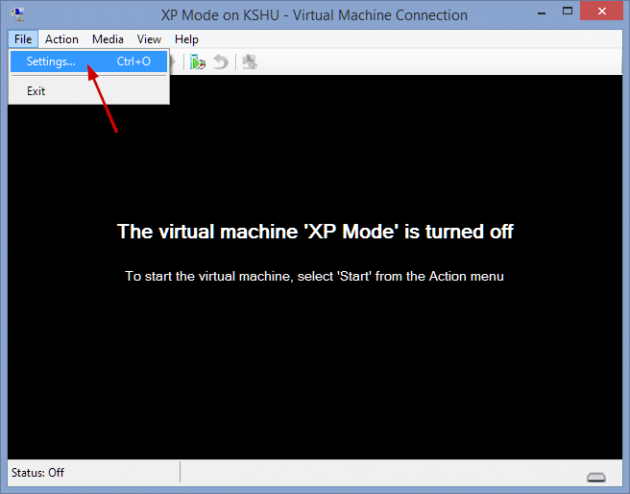
    - b) If the XP VM window is active, you can click File > Settings.

    16 large How to add an XP Mode Virtual Machine to Windows 10 or 8 using HyperV
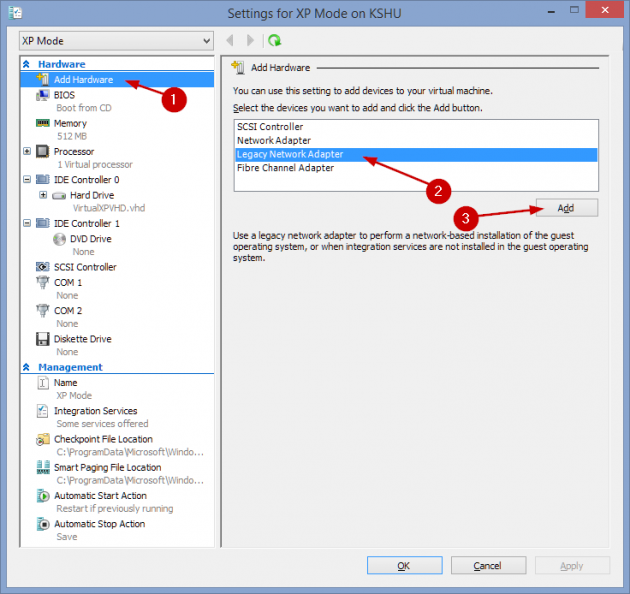
  3. In the Settings window, simply Add Hardware > Legacy Network Adapter. The Add Hardware option is the first one in the Settings window.

    14 large How to add an XP Mode Virtual Machine to Windows 10 or 8 using HyperV
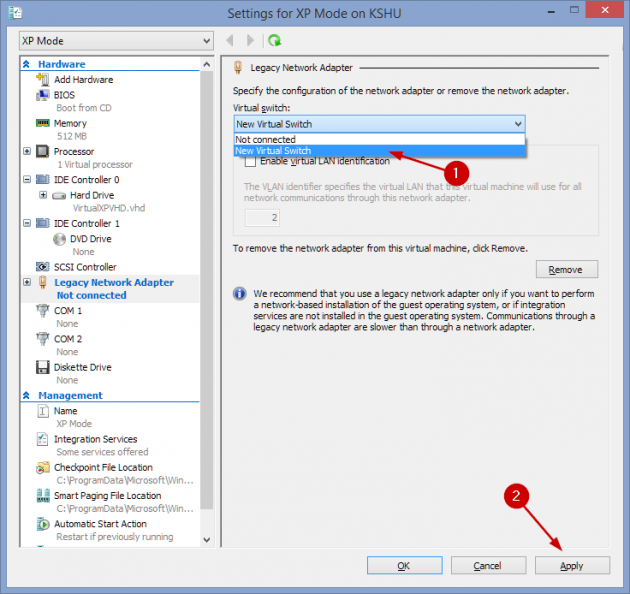
  4. Make sure the Legacy Network Adapter is set to use the previously created Virtual Switch (External).

    15 large How to add an XP Mode Virtual Machine to Windows 10 or 8 using HyperV
  5. Click Apply/OK and start the XP VM again.
It should result in a quick driver install in the VM and, afterwards, the network should work inside the VM.

Friday, August 16, 2019

Cause of  Economic Recession

Loss of confidence in investments
High interest rates
A stock market crash
Falling housing prices and sales
Manufacturing orders slow down
Deregulation
Poor management. Bad business practices 
Wage-price controls
Post-war slowdowns
Credit crunch
When asset bubbles burst
Deflation. Deflation caused by trade wars aggravated the Great Depression.


Math Questions for 2nd Grade. 

There are 49 dogs signed up to compete in the dog show. There are 36 more small dogs than large dogs signed up to compete. How many small dogs are signed up to compete?


Just in case you couldn’t figure out the above, use “x” to substitute large dogs and “y” for small dogs.
Thus, the two equations are: 49 = x+y and y = x+36
Here is how you solve them:

49 = x + x+36

49 = 2x + 36

13 = 2x

x = 6.5

y = 42.5
To put it simply, 49 minus 36 is 13. Thirteen divided by two is 6.5. Hence, 36 plus 6.5 equals 42.5.

Monday, March 25, 2019

Custom Page Sizes for Microsoft Print to PDF

Windows printer drivers need to explicitly specify that they will support custom page sizes, and for some reason Microsoft Print to PDF doesn’t do that.
First you need to find the GPD file for the driver, which is installed under C:\Windows\System32\spool\V4Dirs. I was able to find the folder and file names by using regedit and looking in the registry key HKEY_LOCAL_MACHINE\SOFTWARE\ Microsoft\Windows NT\CurrentVersion\Print\Printers\ Microsoft Print to PDF\PrinterDriverData. On my system it is {084F01FA‑E634‑4D77‑83EE‑074817C03581}\74e1846.gpd; you will probably find you have the same file name but a different folder name.
Now, make a backup copy of the GPD file, so you can restore it if you fumble the editing. Then you need to edit the original file and add the following section, immediately after the line *DefaultOption: LETTER :
*Option: CUSTOMSIZE
{
*rcNameID: =USER_DEFINED_SIZE_DISPLAY
*MinSize: PAIR(936000, 1332000)
*MaxSize: PAIR(5346000, 7560000)
*MaxPrintableWidth: 5346000
}
The values for MaxSize are copied from the largest page size already defined (A3) and the values for MinSize are scaled down proportionately from that to represent A8 size. Save the new file somewhere, then copy it over the top of the original file.
Now you can define a custom page size in the normal way: go to Devices and Printers in the control panel, select the printer Microsoft Print to PDF, click Print Server properties on the ribbon menu, tick Create a new form, give it a name and enter the dimensions you want, then click Save Form. Now when you print something, select Microsoft Print to PDF as the printer, click Preferences, then Advanced and you should see your new page size in the pulldown menu.